Help:Images
Adding images to the FHX Wiki is a great way to enhance the content of an article. Here are some basics on how to make your screenshots wiki-friendly.
Step 1: Taking a screenshot
Depending on the subject of the screenshot, it's preferred that unnecessary clutter is avoided.
- Hide the game UI by pressing `.
- Names can be hidden in Options (it's a good idea to only have NPC names visible in screenshots).
- Swap to 1st person view by pressing F12.
Screenshots can be taken with Print Screen, usually above the home/insert buttons, or by pressing WIN+Shift+S to open the Snipping Tool for Windows 10/11.
Step 2: Preparing the image

Having taken a screenshot, the file will appear in your FHX folder if using Print Screen or your selected directory if using the Snipping Tool.
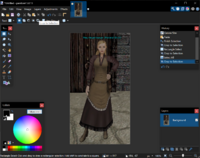
Check that the screenshot turned out as you expected - if not, you might want to retake the screenshot. If you're happy with it, crop the image roughly to the region of interest and save it as a .jpg, .png, or .gif. You can crop images in any basic image editing software, e.g. Microsoft Paint, Paint.NET or GIMP. See the bottom of the page for links to our recommendations.
The maximum file size that can be uploaded is 2 MB.
Step 3: Uploading the image

Once you're logged in, there are two scenarios for uploading an image: (1) you're uploading an entirely new image of a subject that doesn't have an existing file, or, (2) you've got a better screenshot than an existing file.
- To upload a new image from scratch
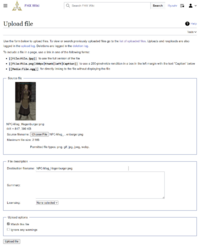
- Visit Upload file (accessible in the Toolbox section of the sidebar). Browse for an image using the Browse button, or drag and drop into the upload form. Then give the file a descriptive name - please don't call it fhx123.jpg!
- Examples: NPC-Roland.jpg, Barbarian_icon.png, Magic_Defense_icon.gif
- To upload a new version of an existing image
- Visit the current file page, e.g. File:Bindstone.png, scroll down, and click on "Upload a new version of this file". Doing this links to the exact same form as for a new image, but the destination name won't change after browsing for the file.
Step 4: Using the image
The best bit - exhibiting your screenshot on the wiki.
Visit a page, click edit, write the following:
[[File:<insert file name here>.<type>|thumb|<insert description here>]]
Use "Show preview" to check that you spelled the filename and syntax correctly, and then press "Save page".
FAQ
- Help! I uploaded a new image but it still shows the previous revision on the file page and/or gallery and/or article or nothing at all.
- This is most likely a cache error and often occurs when the file was just uploaded. Waiting helps, but alternatively you can click the clock at the top of the screen or the 'Refresh' button next to 'Watch'. This purges the page cache. Keep in mind that most often you will need to refresh the file page to fix display issues on articles that use the image in question.
- I uploaded an image, but it doesn't show up on the article. What do I do?
- Did you make sure that you uploaded the file under the right target name? Sometimes when you select an image to upload that has been stored on your pc with a different or generic name (e.g. 'fhx001.jpg'), the destination filename switches from the previous correct one (e.g. 'NPC-Roland.jpg') to your filename. Similarly, pay attention to the format your uploaded image is in (.jpg, .png, or .gif).
External links
These free and open source software packages have been recommended by Wikipedia users for use image manipulation:
| How to help |
|---|
|
