
Help:VisualEditor: Difference between revisions
m (→Tables) |
|||
| (One intermediate revision by the same user not shown) | |||
| Line 70: | Line 70: | ||
;Manipulating the table | ;Manipulating the table | ||
:* Click a cell once to select it | :* Click a cell once to select it | ||
::* Double-click edit it | ::* Double-click to edit it | ||
:* Click the arrows next a row or column to add, move, or delete | :* Click the arrows next to a row or column to add, move, or delete | ||
:* Select multiple cells and click '''Merge''' to merge the selection into one cell | :* Select multiple cells and click '''Merge''' to merge the selection into one cell | ||
Latest revision as of 17:01, 29 June 2024
VisualEditor allows you to edit an article and see what the end result looks like in real-time, instead of relying on navigating wikitext source code.
This guide will cover how to use VisualEditor to create and edit an article.
Getting started
- Opening the visual editor
- Click the Edit tab at the top of an article or edit next to an article section.
Visual editor's toolbar

The visual editor's toolbar appears at the top of the screen when you begin editing. From here you can perform various actions:
- Undo or Redo changes you've made.
- Headings drop-down menu to change how text is styled (paragraph, heading, sub-heading, etc.).
- Formatting drop-down menu to change how text is formatted (bold, italic, etc.).
- Linking tool to add links to an article.
- Lists and indentation to add lists (bulleted, numbered) and changing indentation level of text.
- Insert to insert images, tables, tabber, etc. in an article.
- Special characters to add characters or symbols to text.
- Editing mode to swap between visual and source editing. This can also be done by clicking Edit source at the top of the article.
- Discard edits
- To discard all changes and exit visual editor, you can click Read at the top of the article. This will display a prompt to continue editing or discard edits.
- Save changes
- Click Save changes..." to publish your changes.
Basics of editing

Your first edit
- See also: Help:Editing
Similar to the editing help guide, let's say you spotted a typo or a mistake in a paragraph of text that you want to fix, or you want to add a sentence.
First, click Edit at the top of the article (to edit the whole page) or next to the section you want to edit. This will open the visual editor with the toolbar at the top. Now you can edit the article and see the end result in real-time as you make changes, and don't need to navigate the source wikitext.
After you make your changes, click Save changes... to publish your changes.
Creating new pages
The easiest way to create an entirely new article is to find a link that leads to it, which will show up in red color, such as Help:Example, and click on it. A familiar editing window will appear, and when you save your changes, the new page will be created.
As an alternative, you can search for the exact name you want the page to have in the Search box in the top bar, and click on the red link that appears at the top of the search results.
When you initiate the page creation, it should open the last editor mode you were in. If it opens the source editor, you can manually change to visual by clicking Create at the top of the article.
Text formatting
- See also: Help:Editing#Text formatting
To add text formatting in visual editor, you can use keyboard shortcuts for some formatting or the editor toolbar at the top.
Links

- See also: Help:Editing#Links
Visual editor has a linking tool that can perform the same actions as adding links through wikitext. You can click the tool, or press Ctrl+K, and search for the article you want add a link for. If doing this at the cursor, it will paste the article title as part of the link. You can also highlight text and use the linking tool to add an article link to the text, while keeping the original text in place.
Introduction to other features
Templates
- More details: Help:Templates on MediaWiki
To add a template to an article, place your cursor at the position where you want the template to be inserted. Open the Insert drop-down menu and select template. Alternatively, you can type {{ to open the same dialog.
Use the search function to find the template you want, edit the parameters (if applicable), and click Insert.
You can also edit a template already on the page. When you select the template you want to edit, it turns blue, and a template box appears. Click Edit or double click the template itself to open the template.
-
Inserting a template
-

Editing template parameters
-

Template:Key added to article


Tables
- More details: Help:Tables on MediaWiki
To add a table to an article, place your cursor at the position where you want the table to be inserted. Open the Insert drop-down menu and select table to add a 4x4 table.
- Manipulating the table
-
- Click a cell once to select it
- Double-click to edit it
- Click the arrows next to a row or column to add, move, or delete
- Select multiple cells and click Merge to merge the selection into one cell
Images
- For a guide on taking screenshots, see Help:Images
- To upload an image, go here: Special:Upload
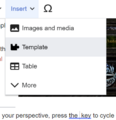
To add an image to an article, place your cursor at the position where you want the image to be inserted. Open the Insert drop-down menu and select images and media.
A dialog will open that automatically searches the wiki for media files related to the title of the article you are editing. You can use the search function to help narrow the options.
Select the thumbnail to insert the image at your cursor placement and another dialog will appear. This dialog allows you to add and edit the caption of the image. The caption can contain formatting and links. When you are done, press "Apply changes" to close the dialog and return to editing the page.
You can also edit an image already on the page. When you select the image you want to edit, it turns blue, and an image box appears. Click Edit or double click the image itself to open the image settings.
Keyboard shortcuts
The visual editor allows you to use keyboard shortcuts to quickly apply formatting without having to use toolbar items. Here are some of the most common shortcuts in the visual editor.
| PC shortcut | Action |
|---|---|
| Ctrl+B | Bold |
| Ctrl+I | Italics |
| Ctrl+K | Insert link |
| Ctrl+X | Cut |
| Ctrl+C | Copy |
| Ctrl+V | Paste |
| Ctrl+Z | Undo |
External links
| How to help |
|---|
|